
Changelog
Feb 17
– Moved creating the TNP into the procedure.
– Rewrote prestep 4.
What is this post – in a nutshell?
This post details the process to enable EDP Standard non-disruptively by leveraging the host maintenance mode in vCenter, to avoid impact to workloads and services. EDP Standard may be enabled either via UI or with a built-in script. called enable_uens.py.
Note: This post details the UI based approach only. We will discuss the scripted approach in a subsequent post.
Related topics:
When should I enable EDP-Standard?
- ✔️ You know EDP Standard is enabled by default in VCF 9.0, but you want the best available host networking performance now, you want to future proof your environments, or simply maximize your investments.
- ✔️ You’re running VMware Cloud Foundation 5.2.2 BOM or have upgraded to the recommended LTS versions of ESX & NSX – which are rock solid for EDP Standard.
- ✔️ Your hosts use current and EDP Standard certified drivers and firmware.
When should this process be used?
- The ESXi hosts run critical workloads or vmkernel services (like vSAN) that cannot tolerate impact.
- The ESXi hosts run non-critical workloads or vmkernel traffic where disruption is not tolerable.
What if I open NSX, and toggle EDP Standard in the NSX Transport Node Profile UI? (instead of following these steps)
- Changing the switch mode via the TNP toggle can disrupt all vSwitch traffic anywhere from a few seconds to many seconds. The disruption varies by NIC & overall configuration.
- Connections may not re-establish without user intervention.
Note: The impact associated to the global toggle approach will be resolved in an upcoming VCF 9.X release.
Gabe, this info belongs in techdocs.com, why are you posting it here?
Absolutely fair, and is what I tried to do here: techdocs.com/enabling-edp-standard-in-active-environments. But … what I fed the doc machine is not what it spit out on the other end. Providing it here in the envisioned format for clarity & your convenience. If anything I’ve written here is in conflict with techdocs, rest assured I am working to reconcile it.
Summary of this Procedure
- Create a new Transport Node Profile (TNP) with the same settings as the current TNP, except switch mode set to Enhanced Data Path – Standard. The new TNP should be identical to the one it’s replacing (with the exception of the mode change).
- In the vCenter Server, for each cluster, place one host at a time in maintenance mode.
- In the NSX Manager, you will change the Transport Node to use EDP Standard, then exit maintenance mode on the host.
- Above step (2.x) will be repeated for every host in the cluster.
- In the NSX Manager, apply the newly created Transport Node Profile (TNP), with the switch mode set to Enhanced Data Path – Standard, to the Transport Node Cluster.
Prep Steps – Review Each for Max Success
- The pNIC Model MUST reflect the installed ESXi version as a Supported Release in the Broadcom Compatibility Guide – IO Devices. The Device Driver and Firmware Version must be compatible with Enhanced Data Path – Standard (previously listed as EDP Interrupt Mode).
Using the latest EDP Standard certified driver/firmware is very strongly recommended!
Why? Certification guarantees that particular NIC/Driver/Firmware combo has passed the feature tests, however – critical fixes may be found in subsequent driver/firmware – the BCG tool does not reflect this. - Create a Transport Node Profile with EDP Standard enabled (Required Prep)
- Take note of the existing Transport Node Profile settings.
- Create an identical TNP replacement with the mode set to Enhanced Datapath – Standard. This new Transport Node Profile will be used in Step 9 of the procedure below.
Note: Refer to Adding a Transport Node Profile for general TNP creation steps.
- Configure the VC to allow vMotion during mode transitions (Recommended)
config.vpxd.network.allowVmotionBetweenENSModes=true
Use this setting in the vCenter Server where the compute cluster or TNC exists. This config ensures VC doesn’t block any mode changes during the vMotion of workload VM’s from one host to another. - Reset RSS parameters to the default (if changed)
EDP Standard is designed for the best performance with default RSS parameters.
To view the current parameters, use this command:
esxcli system module parameters list
The output will look something like this when the defaults have been changed:
esxcli system module parameters list -p “DRSS=X, RSS=Y”
There are three ways to reset the configuration. (If running defaults, proceed to the procedure)
4-0. Reset the parameters manually via the ESXi CLI:
Broadcom: esxcli system module parameters set -m bnxtnet -p “”
Mellanox: esxcli system module parameters set -m nmlx5_core -p “”
Intel: esxcli system module parameters set -m i40en -p “”
4-1. Python Script
The enable_uens script is provided in the NSX Manager, detailed steps are provided in subsequent blog post.
4-2. High Performance Profile (REST API)
A “High-Performance Profile” can be used while each host is in maintenance to reset existing configs. Use the following example High Performance Profile to reset Golden Config type settings:
PUT https://<NSXMGR-IP>/policy/api/v1/infra/host-switch-profiles/<HPPName>
{
“high_performance_configs”: [],
“auto_config”: 0,
“resource_type”: “PolicyHighPerformanceHostSwitchProfile”
}
Refer to Configure High-Performance Host Switch Profiles. Step 4 for detailed instructions on how to apply these profiles to a host.
Procedure
Step 0 Create a Transport Node Profile with EDP Standard enabled
– Take note of the existing Transport Node Profile settings.
– Create an identical TNP replacement with the mode set to Enhanced Datapath – Standard.
– This new Transport Node Profile will be used in Step 9 of the procedure below.
Note: Refer to Adding a Transport Node Profile for general TNP creation steps.
- Open the vCenter Server and navigate to one of the ESXi Hosts.
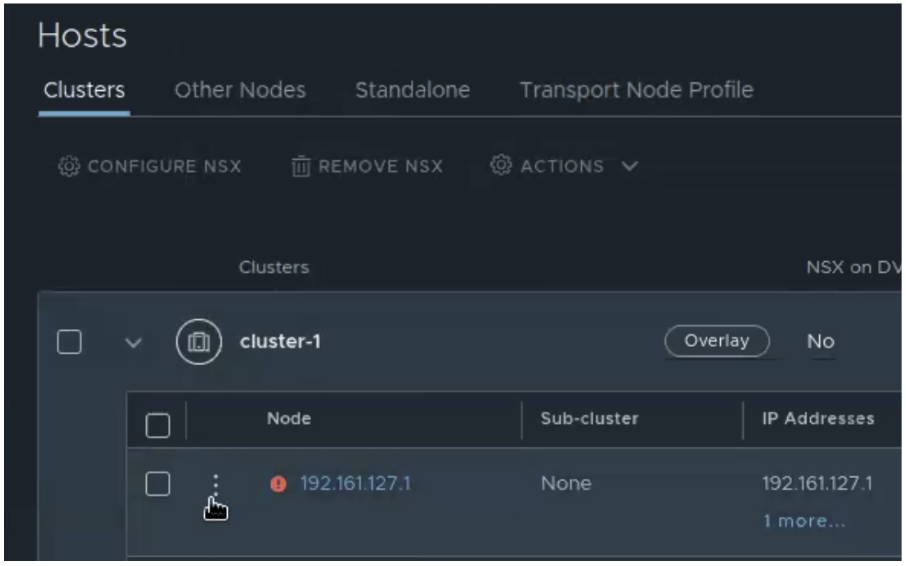
Place the ESXi Host in Maintenance Mode. - Open the NSX Manager, and navigate to System > Configuration – Fabric > Hosts.
- In the Clusters panel, click the Node vertical ellipsis to open the node options.
- In the node options, click Configure NSX.
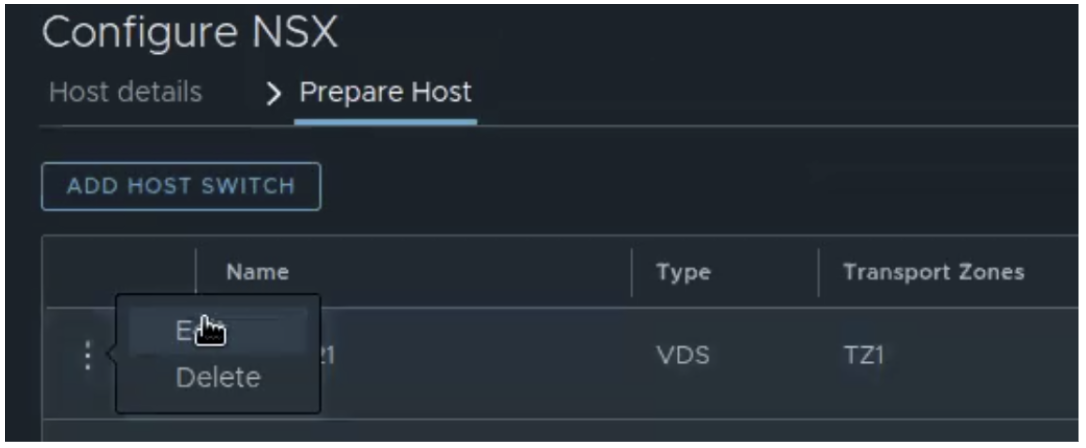
In the Host details panel Click Next.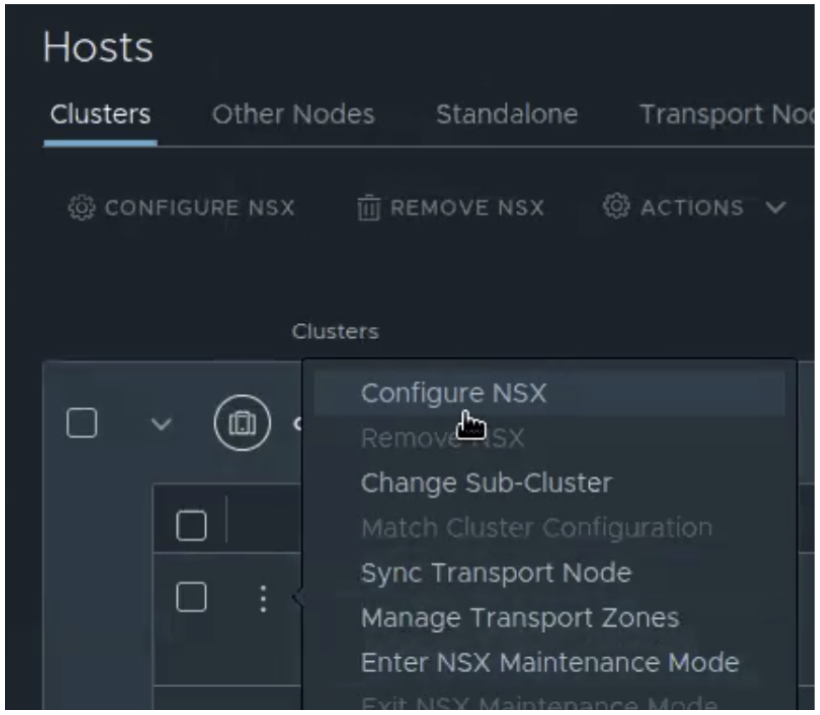
- In the Prepare Host panel, click the vertical ellipsis and Edit the host switch.
- Expand Advanced Configuration and change the mode to Enhanced Datapath – Standard.
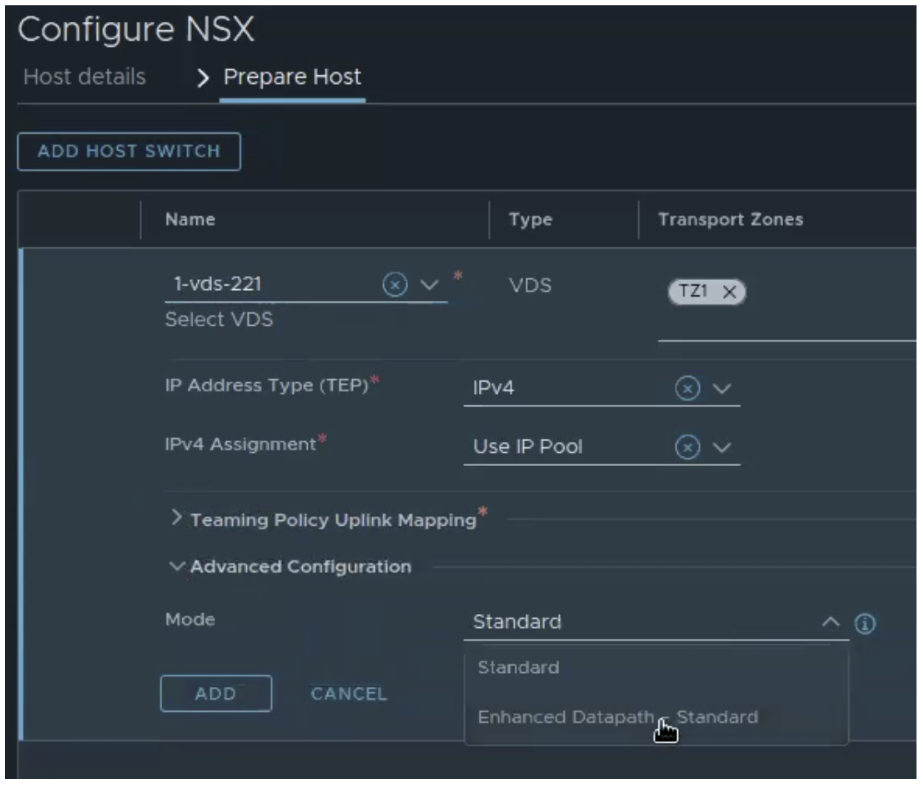
Note: You can verify the mode change was applied on the ESXi shell with the command esxcfg-nics -e.
- In the vCenter Server, exit Maintenance Mode on the ESXi host.
- Repeat steps 1 – 7 for every host in the Transport Node cluster.
- Replace the existing Transport Node Profile with the EDP Standard-enabled replacement TNP created in Step 0.
- Navigate to System > Configuration – Fabric > Hosts.
- In the Clusters panel, select the Cluster and click Configure NSX.
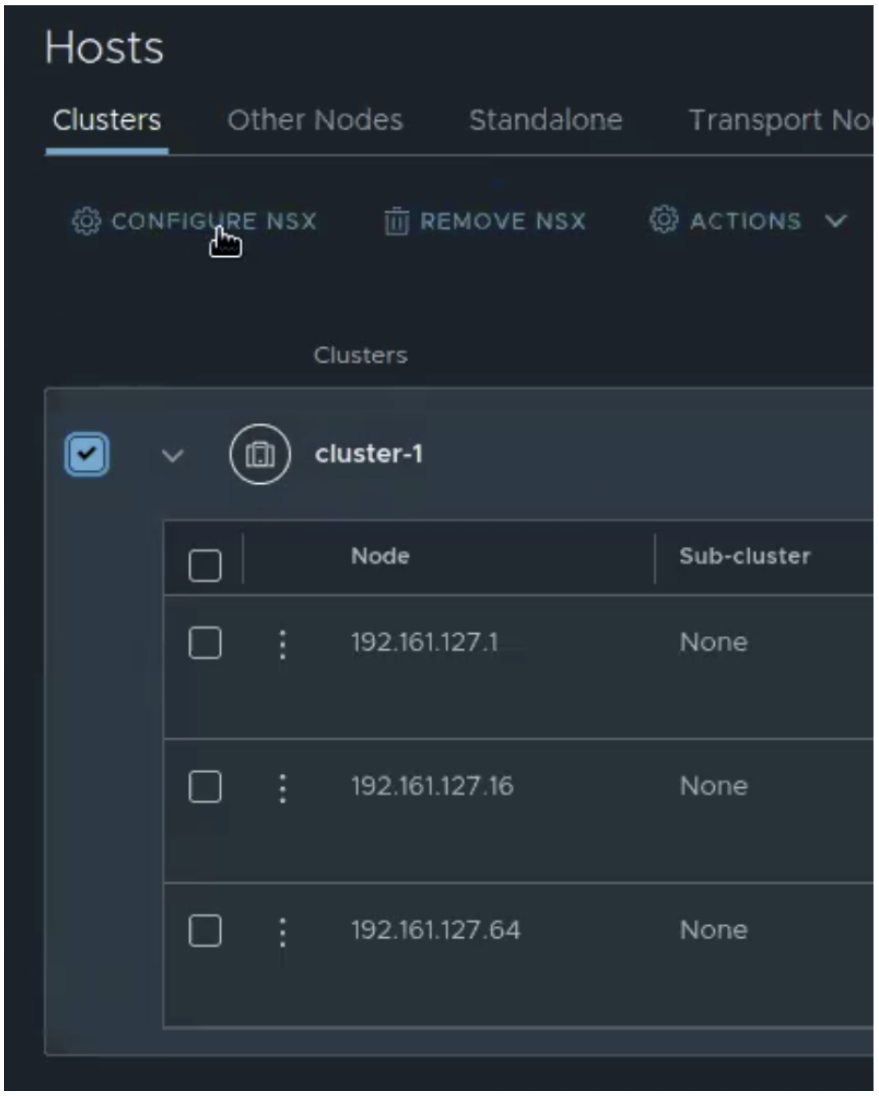
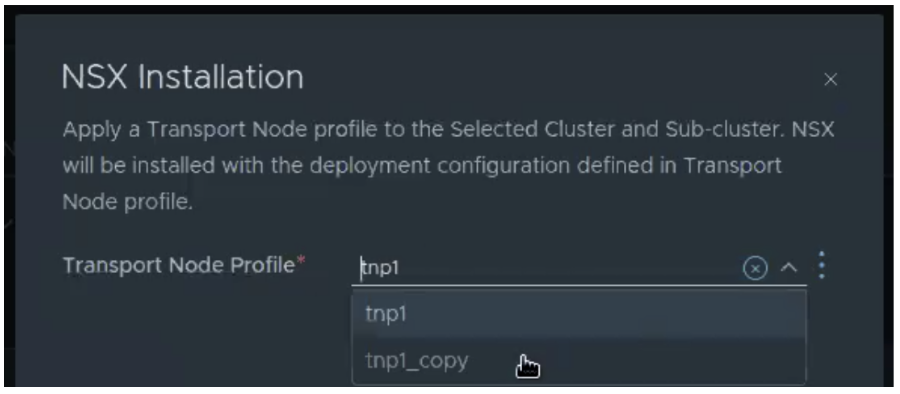
- In the NSX Installation screen, select the new EDP Standard TNP and click Save.
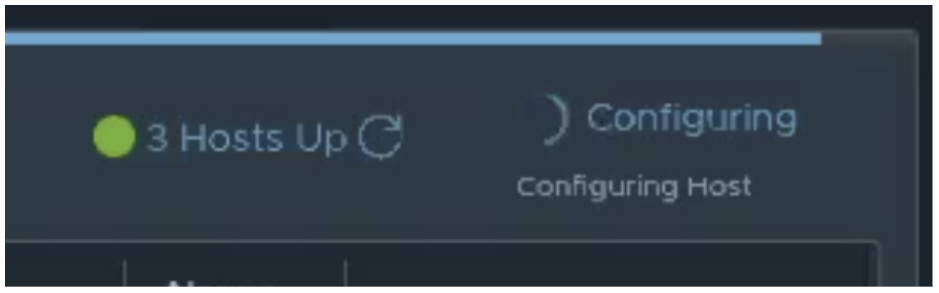
- The TNP cluster with EDP Standard enabled is trued up to the EDP Standard enabled Transport Nodes.
- Navigate to System > Configuration – Fabric > Hosts.
🫶🏼 Thanks for reading!!
~
Gabe
P.S. #6 says hi on behalf of the scooter gang. 
Authors & Editors

Gabe Rosas is a Product Manager at Broadcom, in the VMware Cloud Foundation division. He currently leads Enhanced Data Path, Network Performance & Network Offloads. Previously responsible for migration, networking & performance for VMware HCX.

Samuel Kommu currently works at Broadcom, in the VMware Cloud Foundation division, focusing on profiling network and compute resource usage of various applications and their performance, relevant bench-marking approaches and design recommendations.
P.S. Thanks Samuel Kommu for the technical review & collaboration!

[…] my previous post, we looked at the manual, “maintenance-mode-first” approach to enabling EDP Standard […]
LikeLike